Deviation Actions


Description
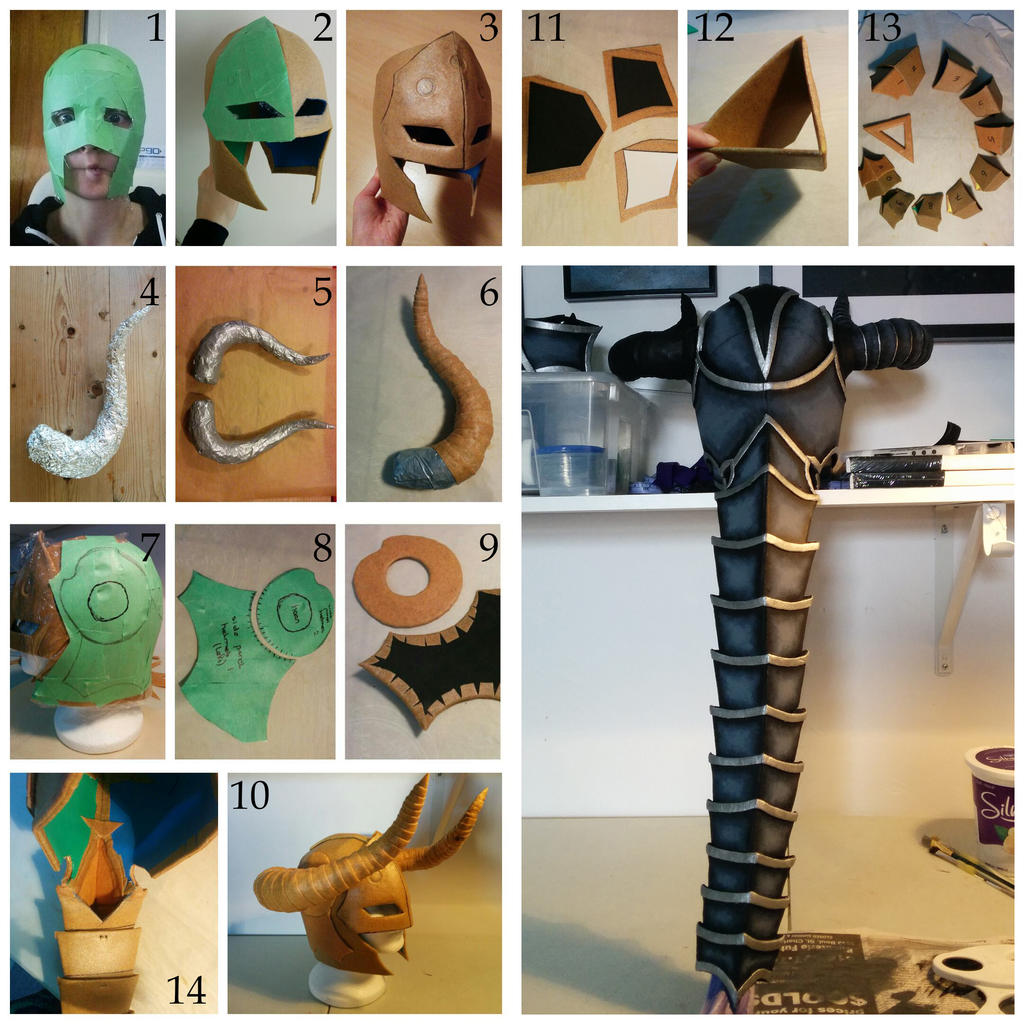
HELMET TUTORIAL – DARKFLAME SHYVANA - LEAGUE OF LEGENDS
1) Pattern that sexy troll face!!! Foil and painters tape is the new Sunday hat guys ![]() Scroll to bottom for instructions on how I made the pattern.
Scroll to bottom for instructions on how I made the pattern.
2) I patterned the helmet detail panels in a similar fashion by applying the tape directly onto the helmet. Also see #7, 8 & 9.
3) To maintain flexibility in the worbla helmet, I used the folding technique rather than the sandwich technique. Since the tail adds a lot of weight to the back, the helmet had to be a rather tight fit in order to stay on properly. However, since the helmet covers so much of the facial and neck area, taking it on and off would have been impossible without some movement in the material. Even now it’s a bit tricky. The “hole” details are simply circular shapes pressed into the worbla to create depth.
4) The horns were built by creating the base shape in tin foil. Yes, getting these two horns to be relatively symmetrical is an absolute nightmare and you will cry, throw a tantrum, slam the horns onto the table a few times, and suddenly you’ll have the right shape ![]()
5) I covered the tin foil with duct tape to strengthen the structure and smoothen the texture.
6) I covered the horns in strips of worbla that overlap each other. This made covering the horn with worbla more cost efficient as you can primarily use scraps, which gave the horns a ribbed texture at the same time for some extra detail.
7) More detail panel patterning.
8) Cutting the patterns from EVA foam & worbla.
9) Folding technique for the detail panels to save some worbla and therefore money. The money you will need to buy comfort food after all the crying you have been doing from the painful test fittings ![]()
10) Still needs trims and a tail, but this is more or less what it should look like. At this point I was ready to mount some human heads onto the horns! No really, I have fun making cosplays ![]()
11) The tail is built from connecting vertebrae. Each vertebra is built from 3 basic pieces for which I used the worbla folding technique (with the exception of the few top and bottom pieces) to keep the weight as light as possible.
12) The 3 pieces combined create a triangle shape, allowing for a hollow tail.
13) Overall, with the exception of the base neck and bottom piece, the same triangle shape is repeated all along the tail, decreasing slightly in size per vertebra. Each vertebra is slid slightly over the previous one.
14) The top vertebra is connected directly to the helmet. However, each following vertebra had two holes in the middle on the backside (the side that rests on my back), both on the top and bottom. Through these holes I looped some fishing wire, tying two vertebrae together both on the top side and bottom. Doing so allows for movement in both a forward and backward direction, as well as sideways. Also, since the tail is hollow, it provided the perfect hiding spot for my own long hair, which was braided and tucked just inside the tail.
Lastly, the tail hair was a wig weft, glued to the bottom of the wig. To darken the eye sockets I simply glued the glasses of an old pair of sunglasses to the inside and sanded down the edges.
=== Pattern Making ===
To pattern anything for worbla, including the head, I wrap the intended area in foil and cover the foil with painters tape. For this helmet, I drew the outline onto the tape. To “flatten” the 3D pattern piece, I cut the pattern in half from the nose to the neck along the topside, and I created darts (like the sewing technique) for the rounded shape at the top of the head. Lastly I took the two pattern halves and applied them to EVA foam and worbla, which created the base helmet structure. Most of these seam lines that were created when I connected the worbla pieces were hidden by my helmet’s detail patterns. The others I worked into the design as details.